Install: Difference between revisions
Crmtogether (talk | contribs) (Created page with "Installation steps: 1. Install the Crystal Runtime files from 'CRRuntime_32bit_13_0_1.msi'. 2. Install the component Log on to CRM and navigate to the “Administration”->...") |
Crmtogether (talk | contribs) No edit summary |
||
| Line 9: | Line 9: | ||
Add the CRViewer.zip component to CRM | Add the CRViewer.zip component to CRM | ||
[[File:component.png]] | |||
Browse and click “upload new component” | Browse and click “upload new component” | ||
[[File:component2.png]] | |||
The component should be displayed in the “Available Components” list | The component should be displayed in the “Available Components” list | ||
Select the component and Click “Install Component” | Select the component and Click “Install Component” | ||
[[File:install.png]] | |||
[[File:component3.png]] | |||
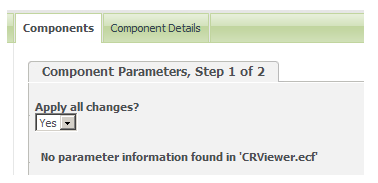
On the following screen click “Install Component” | On the following screen click “Install Component” | ||
[[File:install.png]] | |||
When done your screen should say that the install has been completed | When done your screen should say that the install has been completed | ||
| Line 28: | Line 33: | ||
You will see then that the component is listed as installed | You will see then that the component is listed as installed | ||
[[File:complist.png]] | |||
3. Open IIS | 3. Open IIS | ||
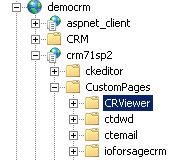
Navigate to the ‘CRViewer’ folder in your CRM install | Navigate to the ‘CRViewer’ folder in your CRM install | ||
[[File:iis1.png]] | |||
And select the “CRViewer” folder | And select the “CRViewer” folder | ||
[[File:iis2.png]] | |||
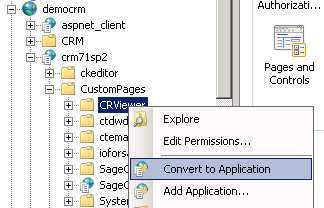
Right click and select “Convert to application” (for older versions of IIS you may be required to complete this step via the properties window) | Right click and select “Convert to application” (for older versions of IIS you may be required to complete this step via the properties window) | ||
[[File:iis3.png]] | |||
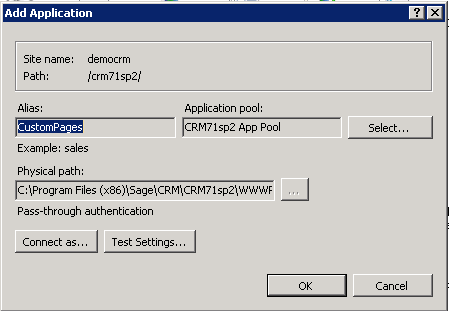
Ensure that the Application pool is the same as the CRM application pool. | Ensure that the Application pool is the same as the CRM application pool. | ||
| Line 44: | Line 54: | ||
You first off need to configure the settings. This is done from the ‘Config’ menu. | You first off need to configure the settings. This is done from the ‘Config’ menu. | ||
[[File:config.png]] | |||
Troubleshooting | Troubleshooting | ||
| Line 50: | Line 60: | ||
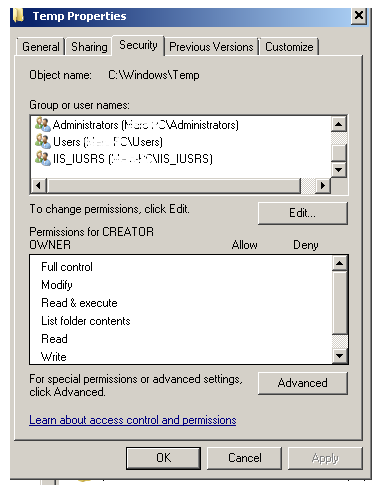
If images (graphs etc) do not appear in your report then you should check your permissions on c:\windows\temp | If images (graphs etc) do not appear in your report then you should check your permissions on c:\windows\temp | ||
Folder as this is the folder that the crystal reports system will use to create and stream from the images. | Folder as this is the folder that the crystal reports system will use to create and stream from the images. | ||
[[File:winper.png]] | |||
Revision as of 13:27, 24 November 2011
Installation steps:
1. Install the Crystal Runtime files from 'CRRuntime_32bit_13_0_1.msi'.
2. Install the component
Log on to CRM and navigate to the “Administration”->”Customisation”->”Component Manager”
Add the CRViewer.zip component to CRM
Browse and click “upload new component”
The component should be displayed in the “Available Components” list
Select the component and Click “Install Component”
On the following screen click “Install Component”
When done your screen should say that the install has been completed
Click “Continue”
You will see then that the component is listed as installed
3. Open IIS Navigate to the ‘CRViewer’ folder in your CRM install
And select the “CRViewer” folder
Right click and select “Convert to application” (for older versions of IIS you may be required to complete this step via the properties window)
Ensure that the Application pool is the same as the CRM application pool.
The ‘CRViewer” is located in the Administration->Email and Documents -> CRViewer
You first off need to configure the settings. This is done from the ‘Config’ menu.
Troubleshooting
If images (graphs etc) do not appear in your report then you should check your permissions on c:\windows\temp Folder as this is the folder that the crystal reports system will use to create and stream from the images.


